Before you begin:
- Draw up a plan of your project so that you can hit the ground running in the field.
Consider using https://www.tls.tools/PlanScan/ - Document each scan location (photos, notes etc)
- Go through the site opening all doors and moving any items that might cast “shadows” before scanning
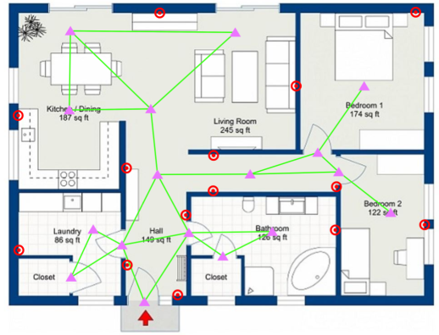
Example Scan Plan
| Scan Position | |
 |
Links/Constraints |
 |
Target Position |
Scanning
- Try to keep the scanner at the same elevation for the whole set and keep the unit as level as possible
- Choose your scan positions with the best chance of overlap with as many of the subsequent scans as possible, try to close loops where you can
- If moving between rooms, make sure to take a scan in the doorway. You should aim to achieve a 30% overlap or more between scans
- As you move from room to room try to ensure that each new scan shares a corner with a previous one. Don’t move too far through the threshold
- Try to maintain a clear line of site between scan locations
- Each time you change level or have a natural break in the site try to create a new bundle, this will help to organise your data later
- When scanning exteriors, consider how features around the subject might be useful in registration
- Troublesome areas (long hallways or repetitive spaces) can be harder to register than others. Consider the use of targets to aid in these areas – create custom targets here: https://tlstarget.com/index.html
 Placing Your Scans
Several factors affect how far you should move between setups:
- Scan density
- Scanner range
- Level of detail required
- Environment